
As a beginner looking to start your own blog, you may have come across numerous content management systems (CMS) that promise an easy and efficient way to manage your content. One such CMS that has gained popularity for its simplicity and focus on publishing is Ghost. Ghost is a modern and open-source CMS designed specifically for bloggers, providing a clean and intuitive interface for creating and managing content. With its minimalist design and powerful features, Ghost has become the go-to choice for many bloggers and content creators. If you’re looking to start a blog, Ghost is an excellent option.
In this comprehensive guide, we’ll walk you through the process of creating a Ghost blog website from scratch. We’ll cover everything from setting up your hosting and installing Ghost to customizing your theme and writing your first blog posts.
You will learn from this Blog:
- Introduction
- Understanding the Basics
- Prerequisites
- A step-by-step guide to start
- Summary
Understanding the Basics of Ghost Blog Setup
Before diving into the setup process, it’s essential to understand the basic components of a Ghost blog. Unlike traditional CMS platforms, Ghost is built on Node.js and utilizes a modern technology stack, offering a streamlined approach to content management. The key elements of a Ghost blog setup include the hosting environment, the Ghost CMS itself, and the theme that determines the blog’s appearance and layout. By grasping these fundamentals, you’ll be better equipped to navigate the setup process and make informed decisions along the way.
Prerequisites:
Before you begin, make sure you have the following prerequisites:
- A web hosting account with Node.js support
- A domain name for your website
- An FTP client or SSH access to your web hosting account
- Basic knowledge of HTML, CSS, and JavaScript (optional)
Step 1: Choosing and Set up the Right Hosting
The first step is to set up hosting for your Ghost blog. You can either host Ghost yourself or use a managed hosting provider. If you’re new to web hosting, we recommend using a managed hosting provider. They will handle the technical aspects of setting up and maintaining your server, so you can focus on creating content.
When choosing a hosting provider for your Ghost blog, consider factors such as server reliability, performance, scalability, and customer support. Look for hosting providers that offer optimized environments for Node.js applications and have experience in supporting Ghost CMS. Additionally, consider the ease of installation and management provided by the hosting platform, as this can greatly impact your experience as a beginner.
Some popular managed hosting providers for Ghost include:
Once you’ve chosen a hosting provider, sign up for an account and create a new droplet or instance. Follow the provider’s instructions to set up your server and install Node.js (if it’s not already installed).
Step-2: Installing Ghost CMS
Once you have chosen a suitable hosting provider, the next step is to install and set up the Ghost CMS. Many hosting providers offer one-click installations for Ghost, making the setup process seamless for beginners. After the installation, you will need to configure essential settings such as the site title, description, and logo. Understanding the user interface and navigation within the Ghost CMS is crucial for efficient content management. Familiarize yourself with the dashboard, content editor, and settings to make the most of the platform’s capabilities.
Installation Methods:
Ghost CMS offers two primary installation methods:
- Self-Hosted Installation: This method involves installing Ghost directly on your web hosting server. It provides greater control over your installation but requires more technical expertise.
- Cloud-Hosted Installation: This method involves using a cloud-based service provider like DigitalOcean or Ghost(Pro) to host and manage your Ghost installation. It’s a simpler option but may have limitations or additional costs.
Step-3: Configuring Ghost

- Once Ghost is installed, access the Ghost admin dashboard by navigating to your blog’s URL followed by
/ghost. - Complete the initial setup process, which includes setting up your blog’s name, user account, and email address.
- Configure your blog’s general settings, such as time zone, language, and SEO settings.
- Familiarize yourself with the Ghost admin dashboard, which allows you to manage posts, pages, users, themes, and other aspects of your blog.
Step-4: Install and Customize Your Ghost Blog Theme
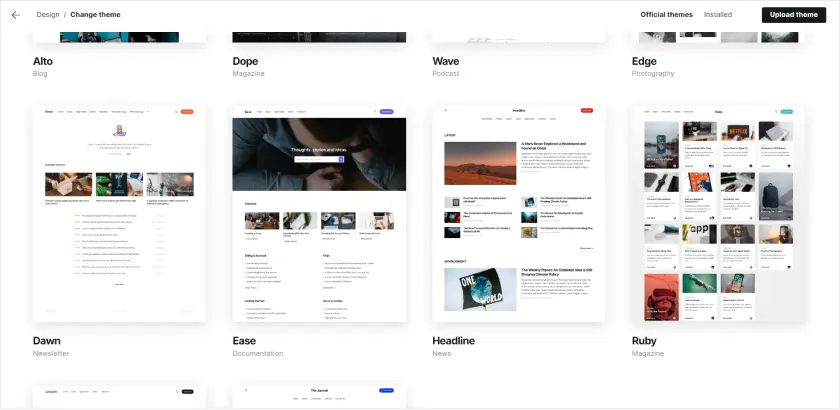
The visual appearance of your blog plays a significant role in capturing the attention of your audience. Ghost provides a range of default themes to choose from, but customizing the theme to align with your brand and style is essential. Whether you opt for a pre-built theme or decide to create a custom design, understanding the process of theme customization is vital for beginners. From adjusting color schemes and typography to adding custom code and integrations, the ability to personalize your blog’s theme will set it apart and make a lasting impression on your readers.
1. Default Theme
Ghost comes with a default theme, Casper, which offers a clean and minimalist design. You can customize this theme or explore other themes available from Ghost’s official theme marketplace.
2. Theme Installation
To install a theme, download the theme files from the source and extract them into the content/themes directory within your Ghost installation.
Installing a premium Ghost theme involves a few steps, including downloading the theme file, uploading it to your Ghost installation, and activating it. Here’s a detailed guide:
1. Purchase the Premium Theme:
- Browse and select a premium Ghost theme from a reputable marketplace or theme developer’s website.
- Complete the purchase process and download the theme file (typically a ZIP file) to your local computer.
2. Upload the Theme File:
- Access your Ghost admin dashboard and navigate to the “Brand and Design” section.
- Click on the “Change Themes” tab and then the “Upload” button.
- Select the downloaded theme ZIP file and click “Upload” to transfer it to your Ghost installation.
3. Activate the Premium Theme:
- Once the theme upload is complete, it will appear under the “Installed” section of the “Themes” tab.
- Click on the “Activate” button next to the newly uploaded premium theme.
- This will make the premium theme the active theme for your Ghost website, replacing the previously active theme.
4. Customize the Theme:
- Many premium themes offer customization options to personalize the appearance of your website.
- Explore the theme’s settings and documentation to adjust colors, fonts, layouts, and other elements to match your branding and preferences.
5. Preview and Publish:
- Once you’ve customized the theme, preview your website to ensure everything looks as intended.
- Once you’re satisfied with the results, publish your website to make the changes live for visitors.
Remember, if you encounter any issues during the installation or customization process, consult the theme’s documentation or contact the theme developer for support.
Step-5: Creating Content
The content creation process within Ghost is streamlined and intuitive, offering a distraction-free writing environment. Understanding the use of tags, categories, and featured images can help you organize your content effectively and improve the overall user experience.
Posts Creation
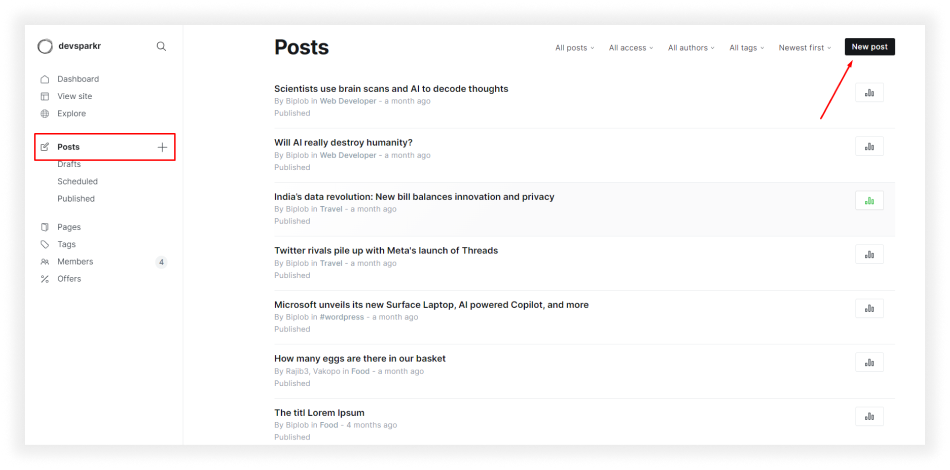
Ghost’s intuitive interface makes creating and editing blog posts a seamless experience. Simply navigate to the Posts section in your Ghost dashboard and start crafting your content.
- Navigate to the “Posts” section: From the left-hand menu, select “Posts” to manage your website’s blog content.
- Create a New Post: Click on the “New Post” button located in the top right corner. This will open the post editor.
- Enter the Post Title: Provide a clear and engaging title for your post. This title will appear at the top of the post and in search results.
- Compose the Post Content: Use the rich text editor to create and format your post content. You can add text, headings, images, videos, and other elements to make your post informative and engaging.
- Customize Post Settings: Click on the “Post Settings” icon in the top right corner of the editor. Here, you can set the post URL, meta description, and other options.
- Review and Proofread: Before publishing, carefully review your post to ensure there are no errors or typos.
- Publish Your Post: Once you’re confident in your post, click the “Publish” button to make it live on your website.
Pages Creation
In addition to posts, Ghost also allows you to create static pages for more permanent content, such as an About Us or Contact Us page.
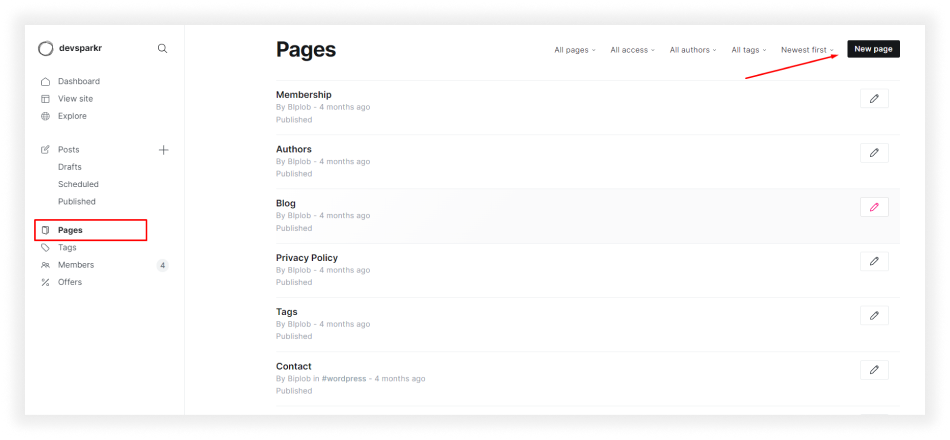
- Navigate to the “Pages” section: From the left-hand menu, select “Pages” to manage your website’s static content.
- Create a New Page: Click on the “New Page” button located in the top right corner. This will open the page editor.
- Enter the Page Title: Provide a clear and descriptive title for your page. This title will appear at the top of the page and in search results.
- Compose the Page Content: Use the rich text editor to create and format your page content. You can add text, headings, images, and other elements to make your page informative and engaging.
- Customize Page Settings: Click on the “Page Settings” icon in the top right corner of the editor. Here, you can set the page URL, meta description, and other options.
- Publish or Save as Draft: Once you’re satisfied with your page, you can either publish it immediately or save it as a draft for further editing.
Step-6: Essential Plugins and Integrations for Your Ghost Blog
Ghost offers a range of built-in features to enhance your blogging experience, but the platform’s capabilities can be further extended through plugins and integrations. As a beginner, it’s important to identify essential plugins that can optimize your blog’s functionality and improve user engagement. Whether it’s adding social media integration, SEO tools, analytics, or email subscription forms, understanding how to install and configure plugins will elevate your Ghost blog to new heights.
Step-7: Launching Your Ghost Blog
As you approach the launch of your Ghost blog, it’s essential to follow best practices to ensure a successful and impactful debut. From creating an engaging “About” page to setting up clear navigation and contact details, attention to detail in the pre-launch phase can make a significant difference. Additionally, optimizing your blog for mobile responsiveness and testing its performance across different devices will ensure a seamless experience for your audience. By focusing on user experience and accessibility, you can set the stage for a successful launch as a beginner.
Step-8: Optimizing Your Ghost Blog for SEO
Search engine optimization (SEO) is a crucial aspect of growing your blog’s visibility and attracting organic traffic. Understanding the fundamentals of SEO and implementing best practices within your Ghost blog can significantly impact its discoverability. From optimizing meta titles and descriptions to creating valuable and relevant content, there are various strategies that beginners can employ to improve their blog’s search engine rankings. By leveraging SEO tools and techniques within Ghost, you can lay a strong foundation for long-term growth and success.
Step-9: Promoting and Growing Your Ghost Blog
Once your Ghost blog is live, the focus shifts to promoting and growing your audience. As a beginner, it’s important to explore various promotional channels such as social media, email marketing, and guest blogging to expand your reach. Engaging with your audience through comments and feedback, and fostering a sense of community around your blog can contribute to its growth. Additionally, understanding the basics of analytics and tracking your blog’s performance will provide valuable insights for refining your promotional strategies and fostering continuous growth.
Step-10: Ensuring the Security and Performance of Your Ghost Blog
As your Ghost blog gains traction, safeguarding its security and optimizing its performance becomes paramount. Implementing best practices for securing your blog, such as regular updates, secure hosting, and strong passwords, can mitigate potential security risks. Furthermore, optimizing your blog’s performance through caching, image optimization, and content delivery networks (CDNs) can enhance the user experience and ensure fast loading times. By prioritizing security and performance, beginners can build a reliable and resilient foundation for their Ghost blog.
Additional Considerations
- SEO: Make sure your blog posts are optimized for search engines. Use relevant keywords in your titles, headings, and throughout the content.
- Social Media: Promote your blog posts on social media to reach a wider audience.
- Analytics: Set up analytics tracking to measure your blog’s traffic and see how your posts are performing.
- Email Marketing: Build an email list and use email marketing to keep your readers engaged and coming back for more.
Creating a Ghost blog website is a straightforward process that can be completed in a few hours. With its simple interface and powerful features, Ghost is an excellent platform for creating a beautiful and engaging blog.
Conclusion
In conclusion, embarking on the journey of setting up and launching a Ghost blog as a beginner can be an exciting and rewarding experience. By understanding the core components of the Ghost CMS, making informed decisions about hosting, and mastering the customization and content creation process, beginners can lay a strong foundation for their blog’s success. With a focus on best practices for launching, growing, and securing the blog, beginners can navigate the intricacies of managing a Ghost blog with confidence. As you embark on this journey, remember that continuous learning and adaptation are key to evolving as a successful Ghost blog owner.
FAQs
Do you have any questions about How to create a Ghost blog website from scratch? We have answers to some frequently asked questions on the topic
What is the recommended installation method for beginners?
For beginners, cloud-hosted installation is generally the recommended approach. It provides a more user-friendly experience and eliminates the need for server configuration and maintenance.
Can I install Ghost CMS on my local computer?
Yes, you can install Ghost CMS on your local computer for development and testing purposes. However, for a live website accessible to the public, you will need to install it on a web hosting server.
How can I get help with using Ghost CMS?
Ghost CMS offers a comprehensive support system, including:
- Documentation: Extensive documentation covering installation, configuration, content creation, and troubleshooting.
- Community Forum: A vibrant community of Ghost users where you can ask questions, share tips, and get support.
- GitHub Issues: A dedicated GitHub repository for reporting bugs and requesting new features.
What are the steps for self-hosting a Ghost blog?
- Create a Ghost user account
- Download Ghost-CLI, the command-line tool for managing Ghost installations
- Create a Ghost instance using Ghost-CLI
- Start the Ghost instance to run the blog
- Access the Ghost admin dashboard for configuration and content management
What are the steps for cloud-hosting a Ghost blog?
- Choose a cloud-based hosting provider that supports Ghost CMS
- Create a Droplet or instance on your chosen cloud provider, ensuring Node.js is installed
- Follow the cloud provider’s specific instructions for installing Ghost CMS, which may vary depending on the provider
Biplob Ariya
Hi, This is Biplob Hossain. I am professional content writer. I successfully wroten a lot of content about Web development topics. I am also good web developer.
Related Articles
Article featured image
 6 min read
•
Ghost
Complete security 5 Tips: How to Secure Your Ghost Website
Learn how to implement crucial security measures, from strong passwords to SSL certificates and brute force protection. Keep your Ghost Website safe and sound!
Updated on — 20 Jan, 2024
Article featured image
7 min read

•
Ghost
How to Start Making Money with Your Blog Website in Ghost CMS
Start blogging with Ghost CMS to build your dream income. Dive into exclusive tips for subscriptions, affiliate marketing, and beyond.
Updated on — 21 Jan, 2024
Article featured image
8 min read

•
Ghost
Ghost Website Performance Optimization Tips and Tricks
Unlock your Ghost Website hidden potential! Master performance optimization techniques for a faster, smoother, and more successful website.
Updated on — 20 Jan, 2024